Importing students en masse via Excel only needs to be done at the start of each academic year, or if you are new to Lexplore. Students must be imported into Lexplore before assessments can take place within the Assessment Application.
The import can be carried out by users with the role of ambassador, examiner, project manager and organisation administrator.
For classes that already exists in Lexplore from previous academic years you can use our roll-up-function - How to move students up into the new academic year (class roll up).
Or, If you need to add just a few, or an individual student, that can be done manually in the Lexplore: How do I add a new or additional student in Lexplore
Steps to follow when importing students with excel to Lexplore Portal:
- Log into the Lexplore Portal and click the cog in the upper right corner. If you are an examiner, project manager or an organisation administrator for an entire organisation, the cog will be visible without you having to filter down to school. If you are importing students to only a specific class, you can also filter down to class before clicking the cog.

- Clicking the cog will take you to the administration page for the school/organisation. In the menu on the left hand side click 'Students'. At the top right, click on 'IMPORT STUDENTS'.

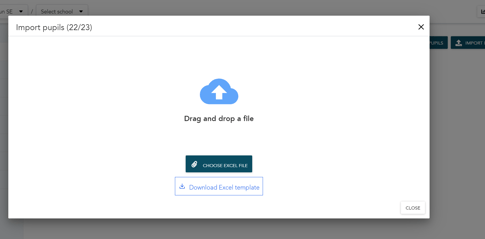
- A box will appear where you can choose DOWNLOAD EXCEL TEMPLATE or CHOOSE EXCEL FILE. If you have not filled in out our template, you first need to select Download Excel template. It is then downloaded to your computer.
- You fill the Excel template with students and classes according to the instructions found on sheet #2 i the excel template. You can also read more here: How do I fill in the Excel template for importing students and classes?
- When excel is populated, save it on your pc.
- Again, click on IMPORT STUDENTS on the administration page
- Click 'CHOOSE EXCEL FILE' or drag the Excel file and drop it in the specified location.
- If there is anything that needs to be changed you will receive information about it before the file can be saved.
- If warnings appear, decide if you want to save or if the Excel file should be updated first.

- Click SAVE. All the data from the file is now in the results portal and application.
- The Excel spreadsheet is missing any of the columns (except Gender or Email Address, as these fields are optional)
- The column headers are not written exactly as listed on the Excel template.
If your school is using the same UPNs as other schools in the organisation, you need to use an abbreviation of the school name as a prefix before all students UPNs.
🛎️Here at Lexplore, we love to help our users with their questions and provide self-help guides for quicker service. Please vote below on the Question of whether or not this article was helpful. 😊