Welcome to this screening training course🌞
The aim of this section is to give you the skills you need to assess your students.
Course structure
This course is aimed at those who will be using an eye tracker to screen their students.
It will consist of the following parts:
- Implementation – everything about how the test is carried out
- Practical training – practise with colleagues, test with a few students and look at the results

Course content:
- The entire test flow
- Equipment
- Calibrating the student´s display
- Test application
- Mark if the student read aloud or silently
- Testing a student at a different year group level
- Re-assessing students
- Preparing for the day
- Handling recordings
- Practical training
- Support - More help

The entire test flow

- After each test, you can add a comment directly in the test application in step 5 of the test flow, if necessary.
- Click on the speech bubble next to the student's name to add a comment.
👇🏼Watch the video below to see what an entire test flow looks like.
Click on cc if you want to see the text.
Equipment
You will need the following to conduct a assessment:
- A display for students to read from
- The monitor's power cable and cable to connect it to your computer (HDMI or other digital input)
- A Tobii eye tracker and, if necessary, its extension cable
- A Windows computer with Lexplore's test application installed and drivers for the eye tracker
- The power cable for your computer
👇🏼Watch the video below to see how to set up the equipment.
Click on cc if you want the text.
Calibrating the student's display
- You need to have the screen setting on “Extend”.
🔗 How do I extend displays? - Before any screening can begin, the student's screen must be calibrated.
👇🏼Watch the video below to see how to calibrate the eye tracker.
Test application
In the right corner of the test application, there are the following 6 icons
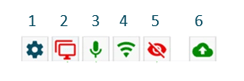
- Language settings - You can change the language you want to receive instructions in within the test application where the assessment is conducted.
- External display - It is important that the external display has its own power supply. The power cable must be plugged into a wall socket. This is to ensure that it does not draw power from the laptop.
- Sound/Microphone - We recommend using the computer's own sound. Make sure the sound is set to 100%.
- Network - An internet connection is required to log into the application. If there is no internet connection, the network icon will turn red. It is possible to continue with the screening even without an internet connection. All files are saved on the laptop's hard drive until they are uploaded to Lexplore's cloud service.
- Eye tracker - If the eye tracker icon is red, this often indicates that something needs to be checked with the power supply to the eye tracker.
- Cloud upload - If your internet connection is slow or unstable, you can temporarily turn off file uploads. This can be helpful if you are using mobile internet or are far away from a Wi-Fi router.
Read more about these settings in the links below.
🔗Configure audio, external monitor and eye tracker for Assessment
🔗 How do I access and change network settings?
Mark if the student read aloud or silently
When the student reads the first text, they are asked to read it aloud. If the student followed this instruction, the Test Application manages this accordingly. The Examiner only needs to save the recording and move on.
- From year 3 onwards the second text is automatically set to allow the students to read it silently in their head. If the students read it silently the Examiner only needs to save the recording and move on.
- If for some reason the student does not follow your instruction, you must click on one of the buttons along the bottom of the screen to reflect the student’s actions. The buttons are available to click on when:
- The student is reading
- The student is answering the comprehension questions.
These are the only two places that the buttons are available. You must make the change at one of these two points and ensure you click the right option before saving. Changes cannot be made afterwards.

Testing a student at a different year group level
All your students will appear in the Test application under their respective class. By default, each student receives a text corresponding to their year group (e.g., a Year 5 student receives a year 5 text).
If a student struggles to complete the text, you can test them at a different year group level:
- Select the student in the Test application.
- Choose “Test student on another level.”
- You may also select a higher level if appropriate.

A dialog box will appear where you can choose the year group level for the student.
Please read the instructions below carefully to see how to proceed.

Re-assessing students
At the end of the term, Lexplore recommends re-assessing students who are performing below average or those you have specific concerns about.
All students are always available in the Test application, but their reading level is not visible there. To simplify reassessment, you can pre-plan the students you want to re-assess. These students will then appear at the top of each class list in the Test application.
How to plan which students to re-assess:
1. In Lexplore, select the school where you want to conduct re-assessments and choose Plan students for assessment.

2.A window will open. Use the filter to select the students you want to plan for
re-assessment.
Click Next after making your selections, and then Save.

3.All students you saved will be marked as Planned in the Test application.
Preparing for the day
- Update your computer and check for any pending system updates that could interrupt the assessment process.
- Before the first day of testing, set up the equipment in the room where you plan to conduct the assessment and make sure everything is working properly.
- It is a good idea to always have a chair outside the room where you are testing. That way, you always have the next student waiting outside, ready to be tested.
This creates a rotating system that saves a lot of time. - It is important that the computer charger is plugged in and that the computer is charged.
- Log in to the test application and check that all icons are green, except for the blue cogwheel, and ready to proceed with the first test.
- Update the computer and check that there are no system updates that need to be done.

Handling recordings
As an examiner, it’s important to know how to manage different types of recordings. In this section, you will learn about:
- Recordings that need reviewing
- Moving and deleting results
- Changing answers on reading comprehension questions
- Students who are “Not reading yet”
1. Recordings that need reviewing
When you log in to The Lexplore Portal and see “Recordings that need reviewing”
followed by a number, this shows how many recordings require your review before the
result can be published. In some cases, recordings may need to be redone.
Details about what needs reviewing are available when you click on a student marked with “Review recording.”
The label for review recording looks like this 
👇🏼 In the video below (note: it plays without sound), you'll see how to locate the recordings that need to be reviewed:
- Find the class that has the Review Recordings label.
- Click on Info in the class list header to sort the students based on whether they have information or not.
- Click into each student who has results that require review.
- Decide what action to take with the result – confirm, delete, or mark as "not yet read".
The text is in Swedish, will change soon!
2. Moving and deleting results
Occasionally, a recording may have been completed on the wrong student or another error occurred. In these cases, you may need to either move or delete the result.
👇🏼 Watch the silent video below to see how this works:
- Find and click on the Assessment you want to move or delete.
- You will see two options: Move result and Delete result—choose the action you need.
- To move, locate the correct student in the list and confirm the move.
- To delete, type Delete in the box and confirm.
3. Changing answers on reading comprehension questions
If you realize after saving a recording that you marked a different answer than the student actually gave, you can easily correct it.
- Go to the student’s recording in The Lexplore Portal (as shown in the video above).
- Select Edit result.
- A box will open where you can adjust the answer(s). Click Save when you are done.
In this box, you can also change the status Not reading yet at the top (more about this below).

4. Students who are not yet reading
If you already know that a student cannot complete a text or the RAN (Rapid Automatized Naming) test, you can select Student is not reading yet.
The student will then receive the result Not reading yet, which corresponds to the white level in Lexplore. This means that no percentile score will be given.

Practical training - Preparing the equipment
Equipment needed:
- An external display with a magnet at the bottom edge, from which the student will read
- An HDMI cable to connect the screen to your laptop or PC
- A Tobii eye tracker attached to the bottom edge of the display
- A laptop or PC with the Test application and Tobii drivers installed
Note: There are two models of eyetrackers, each with its own drivers. If your eye tracker does not work with the installed drivers, please contact Lexplore Support.
🔗Lexplore Software RequirementsPrepare the equipment:
- Ensure the power cable is plugged in at all times and that the computer is fully charged. This helps the eyetracker function properly.
- Log in to the Test application, located on the desktop of the computer you will use.
- Select your organization.
- Choose “Training school.” This option contains fictional student names from all year groups for practice.
Practical training - Practicing with a Colleague
Suggestions for what you can practise:
- Remember to select “Training school.”
- Feel free to pause or interrupt the assessment to observe what happens.
- Ask your colleague to move around occasionally and watch how this affects the recording.
- Choose to read a text at a different reading level
- Choose to mark the student as “Not reading yet”
- End the assessment after one text and note the outcome.
- Show your colleague the recording of their reading by clicking the round globe icon in step 5 of the Test application. This takes you directly to the recording.

Practical training - Practicing with Students
Practicing with students can feel a bit different, as you want to make the experience positive and encouraging for them. It is important to include students in your practice.
Tip:
Ask a few students if they would like to help you practice. Many students enjoy the opportunity to assist and feel included.
- Remember to select “Training school.”
- Choose a text that is suitable for a student who is one year group younger than the one you will be assessing. This prevents the student from encountering the same text during their own assessment later.
Continue practicing until you feel comfortable and ready!
Practical training - Reviewing the Results
Now it’s time to review and analyse your recordings and examine the results in detail.
Review the practice recordings you made with your students.
- Log in to The Lexplore Portal.
- In step 5 of the Test application, click the globe icon to go directly to the results.
- Use the checklist below to review your recordings. This checklist covers the most common mistakes during the assessment.
Be thorough when reviewing. This ensures you have conducted the assessment according to Lexplore’s guidelines and will provide reliable results when assessing your students.
Support - More help
You are always welcome to search for answers to your questions yourself or contact Lexplore Support
👇🏼In the video below, you will see how to search for answers to your questions in the Knowledge base.
Well done!⭐
You have now completed this sub-course on how to screen students with an eye tracker. We hope you feel ready to screen students!
Next training course for you: Insights & Analysis - Theory.
Click on the link below to mark the course as completed.